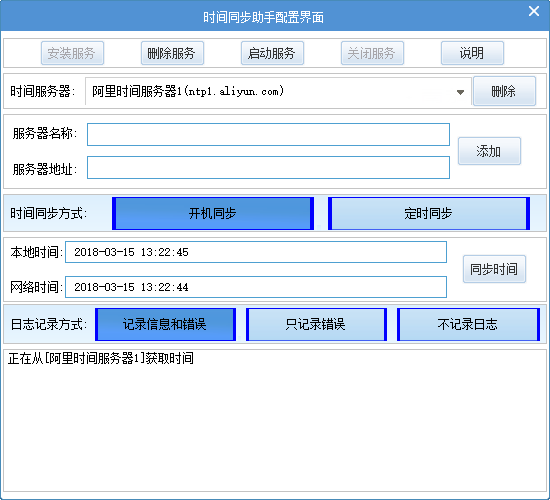
界面效果

设置说明: 设置文件在软件目录下的 set.xml

  1.              cuuId 为当前选择的时间同步服务器ID 就是下面第几个item里的配置 (从零开始)

  2.   
          item 时间服务器列表项  
          name 时间服务器名称  
          ip   时间服务器地址 
          ip2  保留
  3.    后台服务时间同步方式 
              type 1 开机就同步 同步成功后停止服务 
                 2 开始服务后每隔STime分钟同步一次 
              STime   间隔的时间
  4.   日志记录方式
               level 2   记录程序运行生成的调试信息和错误信息
                   3    只记录程序运行产生的错误信息
                   4   不记录任何日志

**注 在界面上或者手动修改配置文件后要手动停止服务在启动服务

程序出来缘由: http://caipiao365.vip/article/12

程序源码: https://gitee.com/zuzong/Projects/tree/master/MyTime

程序下载: https://gitee.com/zuzong/Projects/raw/master/MyTime/exe/MyTime.zip

 缘由 

 家里有两台老电脑,有cmos电池没有电了,还有应该是BIOS出问题了.每次开机后时间恢复成了出厂时间.虽然不是什么大问题,但是也给使用时带来了很大的不方便.然后用win的时间同步服务一直更新不成功.折腾了好长时间(不知道为什么),估计是人长的丑的缘故吧^_^,有知道原因的麻烦告诉我.然后在网上找了一些时间同步的工具,发现不是有广告就是要手动去更新时间,然后就想这与其乱费长时间去试一个个的软件,还不如自己花点时间写一个. 就这样[时间同步小助手]就出来. 

事因

先不废话,来张让人看了就上火的图片.因为平时用浏览器用的多.所以开机就喜欢打开chrome.结果出现下面这张可恶的图片.

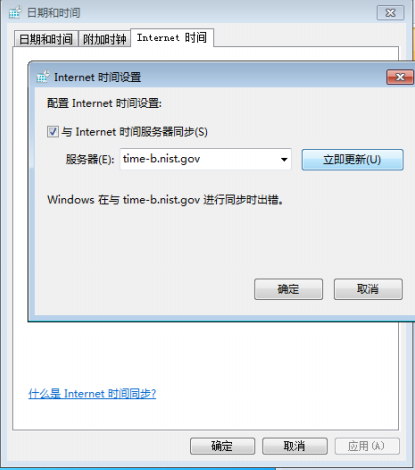
然后打开服务一看,Windows Time服务是自动启动的 而且正在运行中.就这样我打一下面这个界面.


选择里面的服务器 点立即更新 都没法更新. 在这里自己输入时间服务器,结果也报错.没办法就来野蛮一点的打开注册表转到[HKEY_LOCAL_MACHINE\SOFTWARE\Microsoft\Windows\CurrentVersion\DateTime\Servers]手动加时间服务器.然后重启在看里面有了但是还是更新出错.然后左百毒右谷歌,从比必到yandex. 搜到了一些大同小异的文章.然后高高兴兴的去按搜到的资料上的去做,结果我这台电脑居然不按套路出牌.

运行 w32tm  unregister

给我的回复是 

发生下列错误: 拒绝访问。 (0x80070005)

运行 w32tm  /debug /enable /file:......

给我的回复是 

发生下列错误: 拒绝访问。 (0x80070005)

反正执行 不管如何执行 w32tm的相关命令就给那一直不变的 友好的提示:发生下列错误: 拒绝访问。 (0x80070005)


然后就想着不想在折腾你了.没有那么多时间来折腾.去网上找时间同步的软件.下个一来丢盘即用就可以了.然后把时间更新了一下.打开chrom来搜 windows时间同步工具. 一看结果好多呀.然后又开始一个一个try.try. 结果大部分软件功能不好用,甚至还用不了.但是广告特别多.而且还绑定了好多的垃圾软件和流氓软件.应正了 安装5分钟,清理两小时.结果一个非常适合晒太阳的下午白白乱费了.然后我那暴躁的脾气上来了.想想宁愿去通宵几个晚上也要自己做一个时间同步小工具来用.说干就卷起袖子开干.

分析

打开 bing   搜  rfc ntp  找到这份文档 https://tools.ietf.org/html/rfc958 

慢慢的啃完了他.定义了下面的通讯结构(主要看 Appendix A UDP Header Format )

struct NTPPacket
{
    union
    {
        struct _ControlWord
        {
            unsigned int uLI : 2;          // 00 = no leap, clock ok
            unsigned int uVersion : 3;     // version 3 or version 4
            unsigned int uMode : 3;        // 3 for client, 4 for server, etc.
            unsigned int uStratum : 8;     // 0 is unspecified, 1 for primary reference system,
            // 2 for next level, etc.
            int nPoll : 8;                 // seconds as the nearest power of 2
            int nPrecision : 8;            // seconds to the nearest power of 2
        };

        int nControlWord;                  // 4
    };

    int nRootDelay;                       // 4
    int nRootDispersion;                  // 4
    int nReferenceIdentifier;             // 4

    __int64 n64ReferenceTimestamp;        // 8
    __int64 n64OriginateTimestamp;        // 8
    __int64 n64ReceiveTimestamp;          // 8

    int nTransmitTimestampSeconds;       // 4
    int nTransmitTimestampFractions;     // 4
};

/*
主要字段的解释如下:

l              LI(Leap Indicator):长度为2比特,值为“11”时表示告警状态,时钟未被同步。为其他值时NTP本身不做处理。

l              VN(Version Number):长度为3比特,表示NTP的版本号,目前的最新版本为3。

l              Mode:长度为3比特,表示NTP的工作模式。不同的值所表示的含义分别是:0未定义、1表示主动对等体模式、2表示被动对等体模式、3表示客户模式、4表示服务器模式、5表示广播模式或组播模式、6表示此报文为NTP控制报文、7预留给内部使用。

l              Stratum:系统时钟的层数,取值范围为1~16,它定义了时钟的准确度。层数为1的时钟准确度最高,准确度从1到16依次递减,层数为16的时钟处于未同步状态,不能作为参考时钟。

l              Poll:轮询时间,即两个连续NTP报文之间的时间间隔。

l              Precision:系统时钟的精度。

l              Root Delay:本地到主参考时钟源的往返时间。

l              Root Dispersion:系统时钟相对于主参考时钟的最大误差。

l              Reference Identifier:参考时钟源的标识。

l              Reference Timestamp:系统时钟最后一次被设定或更新的时间。

l              Originate Timestamp:NTP请求报文离开发送端时发送端的本地时间。

l              Receive Timestamp:NTP请求报文到达接收端时接收端的本地时间。

l              Transmit Timestamp:应答报文离开应答者时应答者的本地时间。

l              Authenticator:验证信息。

*/


核心代码

UDP通信的代码如下:

#define JAN_1970        0x83aa7e80 /* 1900年~1970年之间的时间秒数 */

bool TimeSockService::GetNetTime(const string strIP,UINT64 &uRetTime)
{
    SOCKET SendSocket;  
    sockaddr_in RecvAddr;  
    uRetTime = 0;
    UString strError; 
    SendSocket = socket(AF_INET, SOCK_DGRAM, IPPROTO_UDP); 
    RecvAddr.sin_family = AF_INET;  
    RecvAddr.sin_port = htons(123);  
    HOSTENT* pHostent = gethostbyname(strIP.c_str());  
    if (pHostent != NULL)
    {  
        RecvAddr.sin_addr.s_addr = *(u_long *)pHostent->h_addr_list[0];;  
    }else 
    {
        strError.Format(L"error in gethostbyname: %d \r\n%s", WSAGetLastError(), sysErrorMsg().c_str());
        LOG_ERR(strError.GetData());
        if (_hWndGUI) SendMessage(_hWndGUI, WM_GET_NET_TIME_ERR, 0, LPARAM(strError.GetData()));

        return false;  
    }

 
    NTPPacket ntpSend = { 0 };
    ntpSend.nControlWord = 0x1B;  
    NTPPacket ntpRecv;

    int tv_out = 5000; 
    setsockopt(SendSocket, SOL_SOCKET, SO_RCVTIMEO, (char*)&tv_out, sizeof(tv_out));
    sendto(SendSocket, (char*)&ntpSend, sizeof(ntpSend), 0, (SOCKADDR *)&RecvAddr, sizeof(RecvAddr));  

    sockaddr fromAddr = { 0 };  
    int nRead = sizeof(fromAddr);  
    if (SOCKET_ERROR != recvfrom(SendSocket, (char*)&ntpRecv, sizeof(ntpRecv), 0, &fromAddr, &nRead))  
    { 
        uRetTime = ntohl(ntpRecv.nTransmitTimestampSeconds) - JAN_1970; 
    }else
    {  
        strError.Format(L"error in recvfrom: %d \r\n%s", WSAGetLastError(), sysErrorMsg().c_str());
        LOG_ERR(strError.GetData());
        if (_hWndGUI) SendMessage(_hWndGUI, WM_GET_NET_TIME_ERR, 0, LPARAM(strError.GetData()));
    }
    closesocket(SendSocket);
    return true;
}

结果

然后封装成win的服务程序.为了方便管理做了个界面.具体效果如下:

验证结果

设置成开机同步后运行后看的效果:

具体用法请点界面上的说明 按钮.欢迎使用找BUG.有什么问题欢迎在这里砸砖头^_^

程序下载地址: https://gitee.com/zuzong/Projects/raw/master/MyTime/exe/MyTime.zip

个人博客地址:http://caipiao365.vip/article/12

更多帮助: http://caipiao365.vip/article/MyTime

win更新错误

安装错误 - 0x80070bc9

安装错误 - 0x8007371b  

sfc /scannow 
DISM.exe /Online /Cleanup-image /Scanhealth
DISM.exe /Online /Cleanup-image /Restorehealth
net stop wuauserv
net stop cryptSvc
net stop bits
net stop msiserver
ren C:\Windows\SoftwareDistribution SoftwareDistribution.old
ren C:\Windows\System32\catroot2 Catroot2.old


历史驱动文件路径

C:\Windows\System32\DriverStore\FileRepository

qemu    arm 笔记待整理

qemu-system-arm -m 1G,slots=3,maxmem=4G \
    -machine type=orangepi-pc -cpu cortex-a7 -dtb dtb/sun8i-h3-nanopi-neo.dtb \
    -smp 4 \
    -kernel vmlinuz-5.10.12-sunxi 
    -initrd uInitrd-5.10.12-sunxi 
    -append "earlyprintk #loglevel=8 earlycon=uart8250,mmio32,0x1c28000,115200n8 console=ttyS0 root=/dev/mmcblk0p1" \
    -no-reboot -nographic -serial stdio -monitor none \
    -hda Armbian_21.02.1_Nanopineo_buster_current_5.10.12.img \
    -nic user,model=allwinner-sun8i-emac,hostfwd=tcp::50022-:22


Works like a charm. If you have an sd-card raw image of armbian, you just need to replace -hda Armbian_21.02.1_Nanopineo_buster_current_5.10.12.img with -drive format=raw,file=sdcard.raw

The answer is a bit late, but it may be useful to someone else, because this page is the first in google for "armbian qemu".

Running image for orange-pi one - Armbian_5.90_Orangepione_Ubuntu_bionic_next_4.19.57.7z:

Extrart Armbian image:

7z e Armbian_5.90_Orangepione_Ubuntu_bionic_next_4.19.57.7z Armbian_5.90_Orangepione_Ubuntu_bionic_next_4.19.57.img


Extract kernel, initrd and dtb:

7z e boot/vmlinuz-4.19.57-sunxi boot/initrd.img-4.19.57-sunxi boot/dtb-4.19.57-sunxi/sun4i-a10-cubieboard.dtb


Run qemu:

qemu-system-arm \
  -M cubieboard -m 1024 -cpu cortex-a8 -dtb sun4i-a10-cubieboard.dtb \
  -kernel vmlinuz-4.19.57-sunxi -initrd initrd.img-4.19.57-sunxi \
  -append 'earlyprintk loglevel=8 earlycon=uart8250,mmio32,0x1c28000,115200n8 console=ttyS0 root=/dev/sda1' \
  -nographic -serial stdio -monitor none \
  -drive file=Armbian_5.90_Orangepione_Ubuntu_bionic_next_4.19.57.img,format=raw,if=none,id=d1 \
  -device ide-hd,drive=d1 \
  -nic user,model=allwinner-emac,hostfwd=tcp::50022-:22


It was tested in qemu 3.1

There’s another way to do this, in Linux at least.

Install qemu-user-static and (if not automatically installed) binfmt. Then copy the Armbian rootfs of the Orange Pi model you want to use to a directory on your PC, e.g. opi-rootfs.

You can now chroot into this directory and it will behave (almost) the same as if you’re on a real Orange Pi

The proper command is ‘sudo chroot opi-rootfs /bin/bash’

You can also mount /dev, /sys, /proc to the same directories in opi-rootfs but for compiling stuff this is not really necessary I think.

Instead of chroot you can also do ‘systemd-nspawn -D opi-rootfs’


相关参考连接

https://wp.dejvino.com/2020/07/orange-pi-zero-running-in-qemu/

https://raspberrypi.stackexchange.com/questions/73699/run-armbian-in-qemu

https://www.qemu.org/docs/master/system/arm/orangepi.html

https://raspberrypi.stackexchange.com/questions/117234/how-to-emulate-raspberry-pi-in-qemu


qemu-system-arm -m 1G,slots=3,maxmem=4G \
    -machine type=orangepi-pc -cpu cortex-a7 -dtb dtb/sun8i-h3-nanopi-neo.dtb \
    -smp 4 \
    -kernel vmlinuz-5.10.12-sunxi 
    -initrd uInitrd-5.10.12-sunxi -append "earlyprintk #loglevel=8 earlycon=uart8250,mmio32,0x1c28000,115200n8 console=ttyS0 root=/dev/mmcblk0p1" \
    -no-reboot -nographic -serial stdio -monitor none \
    -hda Armbian_21.02.1_Nanopineo_buster_current_5.10.12.img \
    -nic user,model=allwinner-sun8i-emac,hostfwd=tcp::50022-:22


set path="E:\Program Files\qemu";%path%
qemu-system-arm -m 1G,slots=3,maxmem=4G -machine type=orangepi-pc -cpu cortex-a7 -dtb dtb/rk3566-orangepi-cm4.dtb -smp 4  -kernel vmlinuz-5.10.160-rockchip-rk356x -initrd initrd.img-5.10.160-rockchip-rk356x -append "earlyprintk #loglevel=8 earlycon=uart8250,mmio32,0x1c28000,115200n8 console=ttyS0 root=/dev/mmcblk0p1"  -no-reboot -nographic -serial stdio -monitor none -hda Orangepicm4.img  -nic user,model=allwinner-sun8i-emac,hostfwd=tcp::50022-:22
qemu-system-arm -m 1G,slots=3,maxmem=4G -machine type=orangepi-pc -cpu cortex-a7 -dtb dtb/rk3566-orangepi-cm4.dtb -smp 4  -kernel vmlinuz-5.10.160-rockchip-rk356x -initrd initrd.img-5.10.160-rockchip-rk356x -append "earlyprintk #loglevel=8 earlycon=uart8250,mmio32,0x1c28000,115200n8 console=ttyS0 root=/dev/mmcblk0p1"  -no-reboot -nographic -serial stdio -monitor none -drive file=Orangepicm4.img,format=raw,if=none,id=d1   -nic user,model=allwinner-sun8i-emac,hostfwd=tcp::50022-:22
qemu-system-arm -M cubieboard -m 1024 -cpu cortex-a8 -dtb dtb/rk3566-orangepi-cm4.dtb -kernel vmlinuz-5.10.160-rockchip-rk356x -initrd initrd.img-5.10.160-rockchip-rk356x -append 'earlyprintk loglevel=8 earlycon=uart8250,mmio32,0x1c28000,115200n8 console=ttyS0 root=/dev/sda1' -nographic -serial stdio -monitor none -drive file=Orangepicm4.img,format=raw,if=none,id=d1 -device ide-hd,drive=d1 -nic user,model=allwinner-emac,hostfwd=tcp::50022-:22
qemu-system-arm -M cubieboard -m 1024 -cpu cortex-a8 -dtb dtb/rk3566-orangepi-cm4.dtb -kernel vmlinuz-5.10.160-rockchip-rk356x -initrd initrd.img-5.10.160-rockchip-rk356x  -nographic -serial stdio -monitor none -drive file=Orangepicm4.img,format=raw,if=none,id=d1 -device ide-hd,drive=d1 -nic user,model=allwinner-emac,hostfwd=tcp::50022-:22
# -drive file=Armbian_5.90_Orangepione_Ubuntu_bionic_next_4.19.57.img,format=raw,if=none,id=d1 \


一 用代码来模拟cpu的:qemu,bochs,pcem,模拟更彻底,适合操作系统编程。

二 直接使用主机cpu的:vmware,virtualbox,kvm,适合跑一般软件。

在 Linux 上使用的是 KVM

Window 上使用 Hyper-V

macOS 中使用 HyperKit 

商业软件有:vmware   parallel desk